FILMING A MUSIC VIDEO
- Jul 7, 2023
- 6 min read
Updated: Jul 13, 2023
Filming music videos can be a fun and experimental way to break into filmmaking; one reason being because there are a lot of turns one video can take. You have the freedom of playing with different lighting techniques and camera angles that help tell a story.
My personal favorite style of music video is mixed with performance shots while telling a story as B-roll. In "Get to Know Me" - by Jules Galli, that was my intention!
PRE-PRODUCTION
In my personal experience, cutting a story with a music video relies crucially on TIMING! If you are looking to make sure you can fit your entire story into the video, you only have a certain amount of time to fit it all in.
I had a specific vision when planning the story for this video. In a nutshell:
Guy enters scene with his friend
Girl enters scene with her friends.
Guy sees girl, girl sees guy
Guy flirts, Girl flirts
Guy and girl have final moment
THE END
THE SHOT LIST
And after pitching the idea and discussing what the story would look like, it’s time for the shot list! There are a ton of apps that help with shot lists and storyboards, some honorable mentions being:
Or you can always go the basic route and just use your notes app to write down what you see in your head. In my case, this was Google Keep.
Making notes like this allows you to make sure the music video would cut together just as you see it. I wouldn’t recommend becoming TOO married to your shot list, since problems can always arise on set. So film with a creative and flexible mind 👍🏻
PRODUCTION
THE SPACE
For this video, Jules found this incredible location in Los Angeles called “Tiny Tokyo.” It’s operated by Cinepacks Studios


The space features a scene that has a ramen bar, a full convenience store, a street lamp, pay phone, and a set of TVs that can play whatever you upload (which gave me a fantastic idea). While I was studying the space online, I saw these TVs and thought that we could film Jules singing to the camera, bringing another element into this music video.
And that’s what inspired Day 1 of filming.
DAY 1
This day was incredibly easy in terms of the setup we needed. These shots were filmed in Jules’ home against a white wall, and consisted of 4 tube lights. The specific ones I used were the Godox TL60 tube lights.
Two lights were placed behind him (one blue and one pink) and two were placed in front, set to daylight, as his key lights. I wanted even lighting on this face for this, and I loved how the lights reflected in his eyes.
From there, it was a simple single camera set up, and several takes of Jules trying different approaches to the song.


One specific moment involved Jules tracking a moving subject in front of him. This came from the idea that TV Jules can be interacting with the real world for a moment. However, this involved having Jules moving his head at different times since I wasn’t sure where I would place that moment. Keep your options open.

DAY 2
THE GEAR
I hadn’t mentioned gear until this point. The video was filmed on my Sony A7sIII with a Sigma 24-70mm f/2.8 lens. This lens was on the majority of the time. There are a couple shots filmed on an 85mm and a 50mm, but I tried not to change lenses too often since I wanted to maximize our time in the space.


I also had a Ronin S with me for the dollying and trucking shots. I particularly liked using it when the guy and girl walk to and from the ramen shop while locking eyes. I was able to track with them, giving this fantastic parallax look to the shot.

THE SET
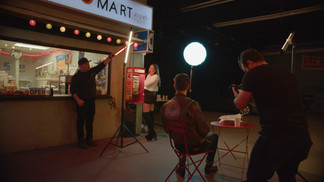
Little Tokyo is a beautiful set that delivers a downtown vibe without the traffic (mostly). It's got a bunch of controllable lights, and pretty much takes care of itself, leaving you only to worry about lighting your subjects.
LIGHTING
All the lighting was motivated by the set. I tried to determine where the light would be hitting the subjects from and placed lights accordingly.
Below are a couple of screen shots and lighting diagrams as to how they were lit:


FILMING THE PERFORMANCE SHOTS
When the Broll was filmed, it was time to set up for the performance shots. The rest of the band hadn’t shown up till later in the day so that once they came to set, they could start setting up their equipment.
For these shots, I wanted the entire set to be behind them, and the location has a large street lamp shining down in the middle of the set. This was the perfect spot to set them up and have that light act as their hair light.
I set two more lights up in front of the band and diffused them to give the entire area a nice key, which would allow me to freely move around, while making sure every performer was seen. I filmed a couple takes on a wide lens, and then switched to a tighter lens for some close ups of each performer.


Afterwards, I had a couple of key moments in the song that I saw in my head. The little riff during the guitar solo was a good example of this. Every time I heard that part of the song, I just saw a close up of the guitarist’s hand sliding down the neck.

Ideally, I would’ve had a shot list for this too. But I sort of winged it and thankfully had it come together well in the edit.
POST PRODUCTION
CUTTING
Because I had my shot list made beforehand, I was able to blaze through the edit and have a cut ready within 24 hours. I edited in my head while filming to make sure my moments were long enough to work in the edit.
The intro to this video was NOT the original version. In fact, the intro was the one thing I couldn’t figure out by the time we started filming.
Originally, the intro had Jules and his brother enter the scene, they said some obscure thing to break the ice to their characters, and then the music starts. This ended up just not working. There wasn’t anything alluring about it, and it didn’t draw curiosity.
Thankfully, Isaac filmed some establishing shots on his camera while I was setting things up before the shot. I ended up using those shots in the beginning of the video to show the location and introduce the song. Then, once the music starts, the boys enter and the story begins.
VFX
There were a couple of visual hiccups that needed to be handled, such as the TV flicker. This wasn’t a complete deal breaker but it was a bit too much for my taste.
I used Neat Video to help tone down some of the flickering. This plugin works amazing! But I noticed that it made my timeline VERY laggy when I started applying it to multiple clips. Honestly, it could’ve been a Premiere Pro issue as well because.. well.. Premiere.

There were also a couple of shots that needed some stabilization that Warp Stabilizer couldn’t handle. So I took some of those clips into After Effects for some tweaking.
COLOR CORRECTION
Once we were picture locked, I used DaVinci Resolve and kept color correction basic. The video was shot in S-log, so a Color Space Transform node was added to bring the colors to REC.709. Afterwards, I added a LUT that I absolutely love. It brings a blueness into the shadows that makes the image much more appealing, and it also helps even out skin tones.

It’s a picky LUT, since lighting conditions need to be adequate for it to work properly. But when it works, IT WORKS! I’m happy to share it with you guys, enjoy!
Afterwards, I tweaked contrast and exposure in the images to make sure all the shots matched, and rendered out the color corrected image to place into the main timeline for final export.
REVISIONS
The original edit featured more shots from the story, and less shots of the band members. During the editing, I still tried to make sure each member had their moment in the spotlight. But I also wanted to remember that this is Jules’ video and that it’s ok to be biased towards him in the video.
When you are creating a music video for a client, you always want to be on the same page as far as the final vision goes. But there are times when the final video is slightly different from what was visualized in pre-production. That’s when you work with the artist to have a video that you are both happy, even if it includes killing some of your darlings.
LESSONS LEARNED
What I’m loving more every day is pre-production. Having everything planned ahead of time just makes the day on set sooooo much smoother.
If you have the resources, I’d suggest taking a day (or half day) to arrive to the location or locations and actually PLAN out the lighting and do some test shoots. Come into the space with your equipment and see how everything will look. Find the bugs beforehand so they don’t exist on shoot day.
Yes, these will take up more time, but they will take a LOAD off your shoulders since all the hiccups will have been discovered and taken care of.
Comments